Amazon Proxy Service
Anonymous HTTP(S) / SOCKS5 Public Proxy Server – Amazon …
Product Overview
Very easy to launch and efficient anonymous proxy server on Linux to access the internet. It supports modern security protocols and requires almost no maintenance. Users can access the proxy server without authentication (public server). Ports: 3128 (HTTPS) and 1080 (SOCKS5) of use:It can be used to browse the internet more privately. This proxy server changes the IP address – this means the destination server doesn’t know who actually made the original request, which helps keeps your personal information and browsing more server allow users to circumvent content restrictions imposed by companies or governments. Several governments around the world closely monitor and restrict access to the internet, and proxy servers offer their citizens access to an uncensored key features of the current version HTTP(S) / SOCKS5 Public Proxy Server v. 0. 9:It supports HTTP / HTTPS and SOCKS5 proxy connection protocols without authentication (public server) supports FTP connections through this proxy server. Multilogin (concurrent connections) is allowed for simple startup procedure – server does not require configuration. After launching the server, it immediately ready to ximum number of simultaneous connections to the server (number of sessions) is 250.
Operating System
Linux/Unix, Ubuntu 18. 04. 4 LTS
Delivery Methods
Amazon Machine Image
Pricing Information
Usage Information
Support Information
Customer Reviews

How to set up an outbound VPC proxy with domain …
November 16, 2020: We’ve updated the CloudFormation template and the launch stack URL used in this solution.
July 24, 2019: We’ve added a link to a GitHub repository that contains the stack content for this solution.
Controlling outbound communication from your Amazon Virtual Private Cloud (Amazon VPC) to the internet is an important part of your overall preventive security controls. By limiting outbound traffic to certain trusted domains (called “whitelisting”) you help prevent instances from downloading malware, communicating with bot networks, or attacking internet hosts. It’s not practical to prevent all outbound web traffic, though. Often, you want to allow access to certain well-known domains (for example, to communicate with partners, to download software updates, or to communicate with AWS API endpoints). In this post, I’ll show you how to limit outbound web connections from your VPC to the internet, using a web proxy with custom domain whitelists or DNS content filtering services. The solution is scalable, highly available, and deploys in a fully automated way.
Solution benefits and deliverables
This solution is based on the open source HTTP proxy Squid. The proxy can be used for all workloads running in the VPC, like Amazon Elastic Compute Cloud (EC2) and AWS Fargate. The solution provides you with the following benefits:
An outbound proxy that permit connections to whitelisted domains that you define, while presenting customizable error messages when connections are attempted to unapproved domains.
Optional domain content filtering based on DNS, delivered by external services like OpenDNS, Quad9, CleanBrowsing, or others. For this option, you do need to be a customer of these external services.
Transparent encryption handling, due to the extraction of the domain information from the Server Name Indication (SNI) extension in TLS. Encryption in transit is preserved and end-to-end encryption is maintained.
An auto-scaling group with Elastic Load Balancing (ELB) Network Load Balancers that spread over several of your existing subnets (and Availability Zones) and scale based on CPU load.
One Elastic IP address per proxy instance for internet communication. Sometimes the web sites that you’re communicating want to know your IP address so they can accept traffic from you. Giving the proxies’ elastic IP addresses allows you to know what IP addresses your web connections will come from.
Proxy access logs delivered to CloudWatch Logs.
Proxy metrics, available in CloudWatch Metrics.
Automated solution deployment via AWS CloudFormation.
Out of scope
This solution does not serve applications that aren’t proxy capable. Deep packet inspection is also out of scope.
TLS encryption is kept end-to-end, and only the SNI extension is examined. For unencrypted traffic (HTTP), only the host header is analyzed.
DNS content filtering must be delivered by an external provider; this solution only integrates with it.
Services used, cost, and performance
The solution uses the following services:
AWS Network Load Balancers. See Elastic Load Balancing pricing.
Four AWS Elastic IP addresses, which are charged if not used, as described in the Elastic_IP_Addresses pricing page.
AWS Secrets Manager, which is used to store the domain list. See AWS Secrets Manager Pricing.
Squid, an open source proxy that is free of charge.
Amazon EC2 on-demand instances, on which the Squid proxies will run. See Amazon EC2 Pricing.
Amazon Linux 2 and AutoScalingGroup, which are both free of charge.
Cloud Watch Logs, which will be used to store the Squid access log. See Cloud Watch pricing.
In total, the solution costs a few dollars per day depending on the region and the bandwidth usage. If you are using a DNS filtering service, you may also be charged by the service provider.
Note: An existing VPC and internet gateway are prerequisites to this solution, and aren’t included in the pricing calculations.
Solution architecture
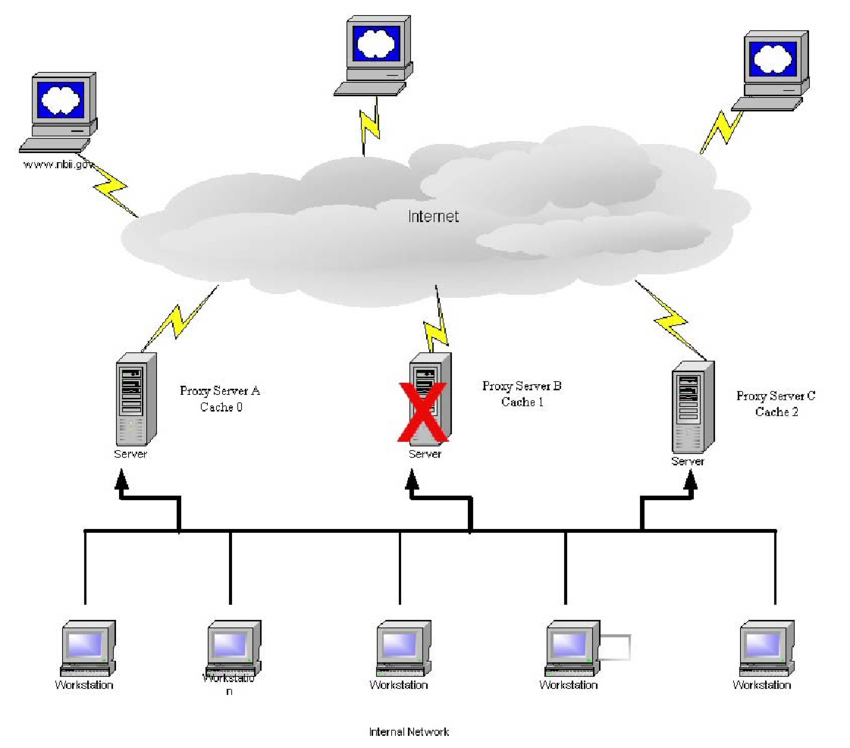
Figure 1: Solution overview
As shown in Figure 1:
The solution is deployed automatically via an AWS CloudFormation template.
CloudWatch Logs stores the Squid access log so that you can search and analyze it.
The list of allowed (whitelisted) domains is stored in AWS Secrets Manager. The Amazon EC2 instance retrieves the domain list every 5 minutes via cronjob and updates the proxy configuration if the list has changed. The values in Secrets Manager are provisioned by CloudFormation and can be read only by the proxy EC2 instances.
The client running on the EC2 instance must have proxy settings pointing toward the Network Load Balancer. The load balancer will forward the request to the fleet of proxies in the target group.
Prerequisites
You need an already deployed VPC, with public and private subnets spreading over several Availability Zones (AZs). You can find a description of how to set up your VPC environment at Default VPC Setup.
You must have an internet gateway, with routing set up so that only traffic from a public subnet can reach the internet.
You don’t need to have a NAT (network translation address) gateway deployed since this function will be provided by the outbound proxy.
Integration with content filtering DNS services
If you require content filtering from an external company, like OpenDNS or, you must register and become a customer of that service. Many have free services, in addition to paid plans if you need advanced statistics and custom categories. This is your responsibility as the customer. (Learn more about the shared responsibility between AWS and the customer. )
Your DNS service provider will assign you a list of DNS IP addresses. You’ll need to enter the IP addresses when you provision (see Installation below).
If the DNS provider requires it, you may give them the source IPs of the proxies. There are four reserved IPs that you can find in the stack output (see Output parameters below).
Installation (one-time setup)
Select the Launch Stack button to launch the CloudFormation template: Note: You must sign in to your AWS Account in order to launch the stack in the required region. The latest stack content can also be downloaded on GitHub, where you can also contribute to the sample code.
Provide the following proxy parameters, as shown in Figure 2:
Allowed domains: Enter your whitelisted domains. Use a leading dot (“. ”) to indicate subdomains.
Custom DNS servers (optional): List any DNS servers that will be used by the proxy. Leave the default value to use the default Amazon DNS server.
Proxy Port: Enter the listener port of the proxy.
Instance Type: Enter the EC2 instance type that you want to use for the proxies. Instance type will affect vertical scaling capabilities and solution cost. For more information, see Amazon EC2 Instance Types.
AMI ID to be used: This field is prepopulated with the Amazon Machine Image (AMI) ID found in AWS Systems Manager Parameter Store. By default, it will point toward the latest Amazon Linux 2 image. You do not need to adjust this value.
SSH Key name (optional): Enter the name of the SSH key for your proxy EC2 instances. This is relevant only for debugging, or if you need to log in on the proxy servers. Consider using AWS Systems Manager Session Manager instead of SSH.
Next, provide the following network parameters, as shown in Figure 2:
VPC ID: The VPC where the solution will be deployed.
Public subnets: The subnets where the proxies will be deployed. Select between 2 and 3 subnets.
Private subnets: The subnets where the Network Load Balancer will be deployed. Select between 2 and 3 subnets.
Allowed client CIDR: The value you enter here will be added to the proxy security group. By default, the private IP range 172. 31. 0. 0/16 is allowed. The allowed block size is between a /32 netmask and an /8 netmask. This prevents you from using an open IP range like 0. 0/0. If you were to set an open IP range, your proxies would accept traffic from anywhere on the internet, which is a bad practice.
Figure 2: Launching the CloudFormation template
When you’ve entered all your proxy and network parameters, select Next. On the following wizard screens, you can keep the default values and select Next and Create Stack.
Find the output parameters
After the stack status has changed to “deployed, ” you’ll need to note down the output parameters to configure your clients. Look for the following parameters in the Outputs tab of the stack:
The domain name of the proxy that should be configured on the client
The port of the proxy that should be configured on the client
4 Elastic IP addresses for the proxy’s instances. These are used for outbound connections to Internet.
The CloudWatch Log Group, for access logs.
The Security Group that is attached to the proxies.
The Linux command to set the proxy. You can copy and paste this to your shell.
Figure 3: Stack output parameters
Use the proxy
Proxy setting parameters are specific to every application. Most Linux application use the environment variables _proxy and _proxy.
Log in on the Linux EC2 instance that’s allowed to use the proxy.
To set the shell parameter temporarily (only for the current shell session), execute the following export commands:
[ec2-user@ip-10-0-1-18 ~]$ export _proxy=
[ec2-user@ip-10-0-1-18 ~]$ export _proxy=$_proxy
Replace
Replace
Next, you can use cURL (for example) to test the connection. Replace
[ec2-user@ip-10-0-1-18 ~]$ curl -k
…
You can add the proxy parameter permanently to interactive and non-interactive shells. If you do this, you won’t need to set them again after reloading. Execute the following commands in your application shell:
[ec2-user@ip-10-0-1-18 ~]$ echo ‘export _proxy=
[ec2-user@ip-10-0-1-18 ~]$ echo ‘export _proxy=$_proxy’ >> ~/
[ec2-user@ip-10-0-5-18 ~]$ echo ‘export _proxy=
[ec2-user@ip-10-0-5-18 ~]$ echo ‘export _proxy=$_proxy’ >> ~/. bash_profile
Replace
Replace
Customize the access denied page
An error page will display when a user’s access is blocked or if there’s an internal error. You can adjust the look and feel of this page (HTML or styles) according to the Squid error directory tag.
Use the proxy access log
The proxy access log is an important tool for troubleshooting. It contains the client IP address, the destination domain, the port, and errors with timestamps. The access logs from Squid are uploaded to CloudWatch. You can find them from the CloudWatch console under Log Groups, with the prefix Proxy, as shown in the figure below.
Figure 4: CloudWatch log with access group
You can use CloudWatch Insight to analyze and visualize your queries. See the following figure for an example of denied connections visualized on a timeline:
Figure 5: Access logs analysis with CloudWatch Insight
Monitor your metrics with CloudWatch
The main proxy metrics are upload every five minutes to CloudWatch Metrics in the proxy namespace:
/sec – errors in processing client requests per second
/sec – cache hits per second
client_. kbytes_in /sec – client uploaded data per second
client_. kbytes_out /sec – client downloaded data per second
quests /sec – number of requests per second
/sec – proxy server errors per second
/sec – proxy server uploaded data per second
/sec – proxy downloaded data per second
/sec – all requests sent by proxy server per second
In the figure below, you can see an example of metrics. For more information on metric use, see the Squid project information.
Figure 6: Example of CloudWatch metrics
Manage the proxy configuration
From time to time, you may want to add or remove domains from the whitelist. To change your whitelisted domains, you must update the input values in the CloudFormation stack. This will cause the values stored in Secrets Manager to update as well. Every five minutes, the proxies will pull the list from Secrets Manager and update as needed. This means it can take up to five minutes for your change to propagate. The change will be propagated to all instances without terminating or deploying them.
Note that when the whitelist is updated, the Squid proxy processes are restarted, which will interrupt ALL connections passing through them at that time. This can be disruptive, so be careful about when you choose to adjust the whitelist.
If you want to change other CloudFormation parameters, like DNS or Security Group settings, you can again update the CloudFormation stack with new values. The CloudFormation stack will launch a new instance and terminate legacy instances (a rolling update).
You can change the proxy Squid configuration by editing the CloudFormation template (section AWS::CloudFormation::Init) and updating the stack. However, you should not do this unless you have advanced AWS and Squid experience.
Update the instances
To update your AMI, you can update the stack. If the AMI has been updated with a newer version, then a rolling update will redeploy the EC2 instances and Squid software. This automates the process of patching managed instances with both security-related and other updates. If the AMI has not changed, no update will be performed.
Alternately, you can terminate the instance, and the auto scaling group will launch a new instance with the latest updates for Squid and the OS, starting from scratch. This approach may lead to a short service interruption for the clients served on this instance, during the time in which the load balancer is switching to an active instance.
Troubleshooting
I’ve summarized a few common problems and solutions below.
Problem
Solutions
I receive timeout at client application.
Check that you’ve configured the client application to use the proxy. (See Using a proxy, above. )
Check that the Security Group allows access from the client instance.
Verify that your NACL and routing table allow communication to and from the Network Load Balancer.
I receive an error page that access was blocked by the administrator.
Check the stack input parameter for allowed domains. The domains must be comma separated. Included subdomains must start with dot. For example:
To include, specify
To include all subdomains of as part of a list, specify
I received a 500 error page from the proxy.
Make sure that the proxy EC2 instance has internet access. The public subnets must have an Internet Gateway connected and set as the default route.
Check the DNS input parameter in the CloudFormation stack, if you use an external DNS service. Make sure the DNS provider has the correct proxy IPs (if you were required to provide them
The webpage doesn’t look as expected. There are fragments or styles missing.
Many pages download content from multiple domains. You need to whitelist all of these domains. Use the access logs in CloudWatch Log to determine which domains are blocked, then update the stack.
On the proxy error page, I receive “unknown certificate issuer. ”
During the setup, a self-signed certificate for the squid error page is generated. If you need to add your own certificate, you can adapt the CloudFormation template. This requires moderate knowledge of Unix/Linux and AWS CloudFormation.
Conclusion
In this blog post, I showed you how you can configure an outbound proxy for controlling the internet communication from a VPC. If you need Squid support, you can find various offerings on the Squid Support page. AWS forums provides support for Amazon Elastic Compute Cloud (EC2). When you need AWS experts to help you plan, build, or optimise your infrastructure, consider engaging AWS Professional Services.
Want more AWS Security how-to content, news, and feature announcements? Follow us on Twitter.

How to Setup a Free Proxy Server on Amazon EC2 – Web …
Open Amazon Web Services (AWS) AccountGo to the AWS Portal and sign up. Credit card will be required, but Amazon will not charge anything. Amazon will also ask for your phone number and verify it. Amazon EC2 offers free Micro Instances which are good enough for proxy server setup. They remain free for the first year of AWS eating an EC2 InstanceOnce you have the account login to AWS Management Console and from the EC2 Dashboard click the Launch Instance. Follow the steps and launch the instance of Ubuntu Server which is marked as Free tier eligible. Make sure you download SSH key file () as it will be needed to connect to stall TinyproxyTinyproxy is a small and fast HTTP/HTTPS proxy server nnect to your instance using the key pair you downloaded during instance setup:ssh -i ~/ ubuntu@54. 84. 12. 216Install Tinyproxysudo apt-get install tinyproxyConfigure TinyproxyStart editing Tinyproxy configsudo nano /etc/nfComment out all Allow lines by adding # sign on each line so connections from all over are accepted. WARNING: anyone who finds this proxy will be able to use it. It is recommended that you shut down the server when it is not used. #Allow 127. 0. 1
#Allow 192. 168. 0/16
#Allow 172. 16. 0/12
#Allow 10. 0/8Optional step: Set DisableViaHeader value to Yes of you want to make your proxy invisible. DisableViaHeader YesRestart Tinyproxy servicesudo service tinyproxy restartOpen Port 8888 for Tinyproxy ServerIn EC2 Management Console go to Security Groups and create a group that allows connections on ports 22 and 8888. Apply this group to proxy instance. Also, it is highly recommended to limit IPs of users by configuring Source settings. Proxies that are left wide open will be discovered by proxy scanners and used by random people. This can result in Amazon charges for network WordsThis tutorial creates a powerful proxy which is open to public. It is highly recommended to use it for a limited time only and stop the instance when not in use. For continued use you should limit access to port 8888 only from your IP address through two mechanisms:
EC2 Security Group. Source setting.
Allow settings in the /etc/ mments are closed.
Frequently Asked Questions about amazon proxy service
Does AWS have a proxy service?
The proxy can be used for all workloads running in the VPC, like Amazon Elastic Compute Cloud (EC2) and AWS Fargate. … One Elastic IP address per proxy instance for internet communication. Sometimes the web sites that you’re communicating want to know your IP address so they can accept traffic from you.Jun 27, 2019
How do I set up an Amazon proxy?
How to Setup a Free Proxy Server on Amazon EC2Open Amazon Web Services (AWS) Account. Go to the AWS Portal and sign up. … Creating an EC2 Instance. … Install Tinyproxy. … Configure Tinyproxy. … Open Port 8888 for Tinyproxy Server. … Final Words.Mar 4, 2019
How do I get a proxy service?
How to Create a Proxy Server on WindowsOn your Windows computer, launch the Settings (Start>Settings).Click on the Network and Internet option.Click on Proxy settings.Enable the Use Setup Script option.Enter the script address you were given (by your employer, school, or another server owner.) and select Save.Mar 26, 2021