How To Turn Off Proxy Settings In Internet Explorer
How to remove proxy settings in your browser – Bitdefender
Some forms of malware redirect users to particular websites without their approval. When dealing with this type of malware, it is necessary first to disable the proxy settings in your browser.
To do this, follow the steps detailed below:
For Google Chrome ›
For Mozilla Firefox ›
For Microsoft Edge ›
For Internet Explorer › Related Articles
Can I update Bitdefender Antivirus for Mac through a Proxy Server?
How to update Bitdefender through a proxy server (Windows)
Was this article helpful?
Rate this item:
Rating: 1. 0/1. From 89 votes.
Please wait…
Sorry about that
How can we improve it?
For any issues with Bitdefender you can always contact us using this form

How to Disable Proxy Settings in Your Web Browser – Enigma …
At times, due to stubborn malware, you may have the need arise to disable your proxy settings within your web browser application. In the attempt to manually remove spyware or malware threats from your system that may redirect you to unwanted sites without your permission, you must disable proxy settings that the malware may have loaded within your web browsers. Additionally, disabling proxy settings in web browsers is essential in the event that an antivirus or antispyware application deletes the malicious file acting as a proxy without first disabling the proxy in the web browser. In such a case, your Internet access may be disrupted within the affected web browser applications. Restoring Internet access will require disabling proxy settings in the web browser.
Disabling proxy settings in web browsers is a relatively easy task. Though, each web browser has a different method of changing or disabling proxy settings within a certain set of options or settings. Below are the quick steps for disabling proxy settings in the most popular web browser applications, including Google Chrome, Internet Explorer, Firefox and Safari.
How to Disable Proxy Settings in Google Chrome
Open the Customize and Control Google Chrome menu by clicking on the three-line icon at the top right of Google Chrome, select Settings on the left, find Network and finally select Change proxy settings.
Select the LAN Settings button.
Deselect the checkbox for Use a proxy server for your LAN.
Click OK.
Your proxy settings should now be disabled.
How to Disable Proxy Settings in Internet Explorer
Click the Tools button and then select Internet Options.
Click the Connections tab and then select LAN settings.
Uncheck the check box for Use a proxy server for your LAN.
Click OK until you return to the Internet Explorer browser.
How to Disable Proxy Settings in Firefox
Click the Tools (or Firefox drop-down menu) button and select Options.
Go to the Advanced panel and select the Network tab.
Where it says Connection section, click on Settings.
Select No Proxy.
Close the Connection Settings window and then click OK to close the Options window.
How to Disable Proxy Settings in Safari
Go to Menu and click on Preferences from the dropdown menu.
Select the Advanced tab and then click on the Change Settings button.
Your proxy settings should now be disabled.

Internet Explorer 10 proxy setting in a Group Policy Object is corrupted
Windows 8. 1 Enterprise Windows 8. 1 Windows 8. 1 Pro Windows Server 2012 R2 Datacenter Windows Server 2012 R2 Essentials Windows Server 2012 R2 Foundation Windows Server 2012 R2 Standard Windows 8 Enterprise Windows 8 Windows 8 Pro Windows Server 2012 Datacenter Windows Server 2012 Datacenter Windows Server 2012 Essentials Windows Server 2012 Foundation Windows Server 2012 Foundation Windows Server 2012 Standard Windows Server 2012 Standard
Note: The Internet Explorer 11 desktop application will be retired and go out of support on June 15, 2022 (for a list of what’s in scope, see the FAQ). The same IE11 apps and sites you use today can open in Microsoft Edge with Internet Explorer mode. Learn more here.
Symptoms
Consider the following scenario:
You use the Group Policy Management Console (GPMC) on a computer that runs Windows 8. 1, Windows Server 2012 R2, Windows 8, or Windows Server 2012 to manage a domain.
You locate and then enable the following policy in a Group Policy Object (GPO). To do this, follow these steps:
Click Start, type in the Start Search box, and then press ENTER.
Expand User Configuration, and then expand Preference.
Right-click Internet Settings, click New and then click Internet Explorer 10.
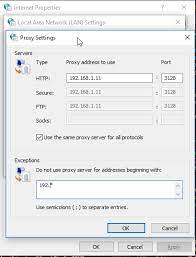
Click LAN settings on the Connections tab, select the Use a proxy server for your LAN check box.
Set the proxy, for example, Proxy1, Port: 80, and then click OK.
You open the item again, click the Advanced button in the LAN settings dialog box, and then click OK.
In this situation, the proxy settings disappear from the LAN settings dialog box though they still exist in the Proxy settings dialog box.
Resolution
To resolve this issue in Windows 8. 1 and Windows Server 2012 R2, install update resolve this issue in Windows 8 and Windows Server 2012, install the hotfix that is described in this article.
Update information for Windows 8. 1 and Windows Server 2012 R2
For more information about how to obtain update 2919355, click the following article number to view the article in the Microsoft Knowledge Base:
2919355 Windows RT 8. 1, Windows 8. 1, and Windows Server 2012 R2 Update April, 2014
Hotfix information for Windows 8 and Windows Server 2012
A supported hotfix is available from Microsoft. However, this hotfix is intended to correct only the problem that is described in this article. Apply this hotfix only to systems that are experiencing this specific problem. If the hotfix is available for download, there is a “Hotfix Download Available” section at the top of this Knowledge Base article. If this section does not appear, submit a request to Microsoft Customer Service and Support to obtain the hotfix. Note If additional issues occur or if any troubleshooting is required, you might have to create a separate service request. The usual support costs will apply to additional support questions and issues that do not qualify for this specific hotfix. For a complete list of Microsoft Customer Service and Support telephone numbers or to create a separate service request, visit the following Microsoft website:
The “Hotfix Download Available” form displays the languages for which the hotfix is available. If you do not see your language, it is because a hotfix is not available for that language.
Prerequisites
To apply this hotfix, you must be running Windows 8 or Windows Server 2012.
Registry information
To use the hotfix in this package, you do not have to make any changes to the registry.
Restart requirement
You must restart the computer after you apply this hotfix.
Hotfix replacement information
This hotfix does not replace a previously released hotfix.
The global version of this hotfix installs files that have the attributes that are listed in the following tables. The dates and the times for these files are listed in Coordinated Universal Time (UTC). The dates and the times for these files on your local computer are displayed in your local time together with your current daylight saving time (DST) bias. Additionally, the dates and the times may change when you perform certain operations on the files.
Windows 8 and Windows Server 2012 file information notesImportant Windows 8 hotfixes and Windows Server 2012 hotfixes are included in the same packages. However, only “Windows 8” is listed on the Hotfix Request page. To request the hotfix package that applies to one or both operating systems, select the hotfix that is listed under “Windows 8” on the page. Always refer to the “Applies To” section in articles to determine the actual operating system that each hotfix applies to.
The files that apply to a specific product, milestone (RTM, SPn), and service branch (LDR, GDR) can be identified by examining the file version numbers as shown in the following table:
Version
Product
Milestone
Service branch
6. 2. 920 0. 16xxx
Windows 8 and Windows Server 2012
RTM
LDR
6. 20xxx
The MANIFEST files (. manifest) and the MUM files () that are installed for each environment are listed separately in the “Additional file information for Windows 8 and Windows Server 2012” section. MUM, MANIFEST, and the associated security catalog () files, are very important to maintain the state of the updated components. The security catalog files, for which the attributes are not listed, are signed with a Microsoft digital signature.
For all supported x86-based versions of Windows 8
File name
File version
File size
Date
Time
Platform
6. 9200. 16384
721, 920
26-Jul-2012
00:37
x86
6. 20927
5, 027, 328
26-Jan-2014
23:43
6. 20926
574, 976
23-Jan-2014
02:45
153, 600
02:48
214, 528
01:19
2, 423, 808
02:31
For all supported x64-based versions of Windows 8 and of Windows Server 2012
771, 072
03:05
x64
5, 440, 512
27-Jan-2014
05:21
768, 512
211, 456
271, 872
3, 273, 216
Status
Microsoft has confirmed that this is a problem in the Microsoft products that are listed in the “Applies to” section.
More Information
For more information about software update terminology, click the following article number to view the article in the Microsoft Knowledge Base:
824684 Description of the standard terminology that is used to describe Microsoft software updates
Additional file information for Windows 8 and Windows Server 2012
Additional files for all supported x86-based versions of Windows 8
File property
Value
Not applicable
1, 848
Date (UTC)
Time (UTC)
13:21
1, 463
nifest
721
712, 709
Additional files for all supported x64-based versions of Windows 8 and of Windows Server 2012
1, 090
13:22
712, 715
2, 310
1, 684
Not applicable
Frequently Asked Questions about how to turn off proxy settings in internet explorer
How do I disable proxy settings?
At the bottom of the screen, click Show advanced settings… This will bring up the Windows Internet Options. Click the Connections tab and then LAN Settings. In the Proxy server settings, uncheck the box that says Use a proxy server for your LAN, then click OK.
How do I turn off proxy settings in Internet Explorer 11?
Click the Tools button and then select Internet Options. Click the Connections tab and then select LAN settings. Uncheck the check box for Use a proxy server for your LAN. Click OK until you return to the Internet Explorer browser.
How do I turn on proxy settings in Internet Explorer?
Right-click Internet Settings, click New and then click Internet Explorer 10. Click LAN settings on the Connections tab, select the Use a proxy server for your LAN check box. Set the proxy, for example, Proxy1, Port: 80, and then click OK.